
Welcome to part three of the Into the Deep End series, the series in which I chronicle my progress learning the Grand Operational Simulation Series title Hurtgen: Hell’s Forest. (Check out part one and part two in case you have missed them.)
Into the Deep End
Yep, I finally found a title for this series of articles. GOSS is not known to be a low-complexity game. I, on the other hand, am everything but an experienced wargamer. So, yes, it feels a little bit like jumping Into the Deep End…
Switching Gears
When you reach the second part of the GOSS rulebook be aware that it’s ‘heavier’ than the first part. Whatever happened in the first part of the rules will feel like a walk in the park. The second part will require some effort from the reader. Well, at least I had to put in more effort. I suggest to bring a pen and paper, have some the counters ready and replay the examples while reading. Don’t skip anything! Reserve a couple of hours.
As said before, my notes can’t be a replacement for reading the rules. You still have to put in some work yourself. But maybe my notes can be of any help.
While I had actually planned for today to introduce the procedures of Fire Support in GOSS, I realized that I should first talk about the Supply rules. We will come back to Artillery and Air Support (no Naval Fire Support in Hurtgen: Hell’s Forest! 🙂 ) next time.
So, let’s do this!
A Word (or more) About Supply and Logistics
I thought about starting with Supply because it is the logical chain of events. You first have to receive your ammunition before you can use it. The rulebook has a slightly different order: Fire Support -> Ground Assault -> Supply. Which is absolutely fine, but also makes for some awkward forward references.
You might have guessed it already, Supply rules in GOSS are very… rich, to say the least. They are spread over two chapters or seven pages (Even the procedures for Ground Assault have ‘only’ a length of six pages.). I had to jump back and forth between the chapters and the table with the abbreviations which really annoys me when I have to read on an electronic device.
My bet is that the level of detail you find in GOSS concerning Supply will put off a good fraction of players. Understandable! Not everyone is interested in this additional simulation dimension that comes with Supply. And a great many games do just fine without fiddly Supply rules. But if you are anything like me, then you don’t mind brooding over plans making sure your guys have enough ammunition. I do appreciate when a designer tries to reduce the level of abstraction for Supply. Take the Operational Combat Series (OCS) by Multi-Man Publishing for example. I understand that pushing Supply Point chits around the map is not for everyone. But I do enjoy the task of setting up and then protecting a Supply Network (That’s not to say that I’m any good at it!). I’m digressing, and should leave this discussion for a dedicated post.
So, Supply in GOSS. It’s extensive but it’s also not rocket science. Let’s pick it apart.
Two Kinds of Supply
There are two kinds of supply used in the game.
p. 41, GOSS Rules v17
At least that’s what the rulebook says. Really? Are there two kinds of Supply? I mean, I get what they are trying to say, but it sounds really like sloppy game slang. And I’m not sure this is helpful. It’s those things that let some less experienced players stumble. But maybe I completely misunderstand what the rules are trying to simulate. Here is my takeaway:
- You need a distribution system.
- You need to decide what goods and how many goods will be distributed.
To achieve this, GOSS introduces:
1) General Supply
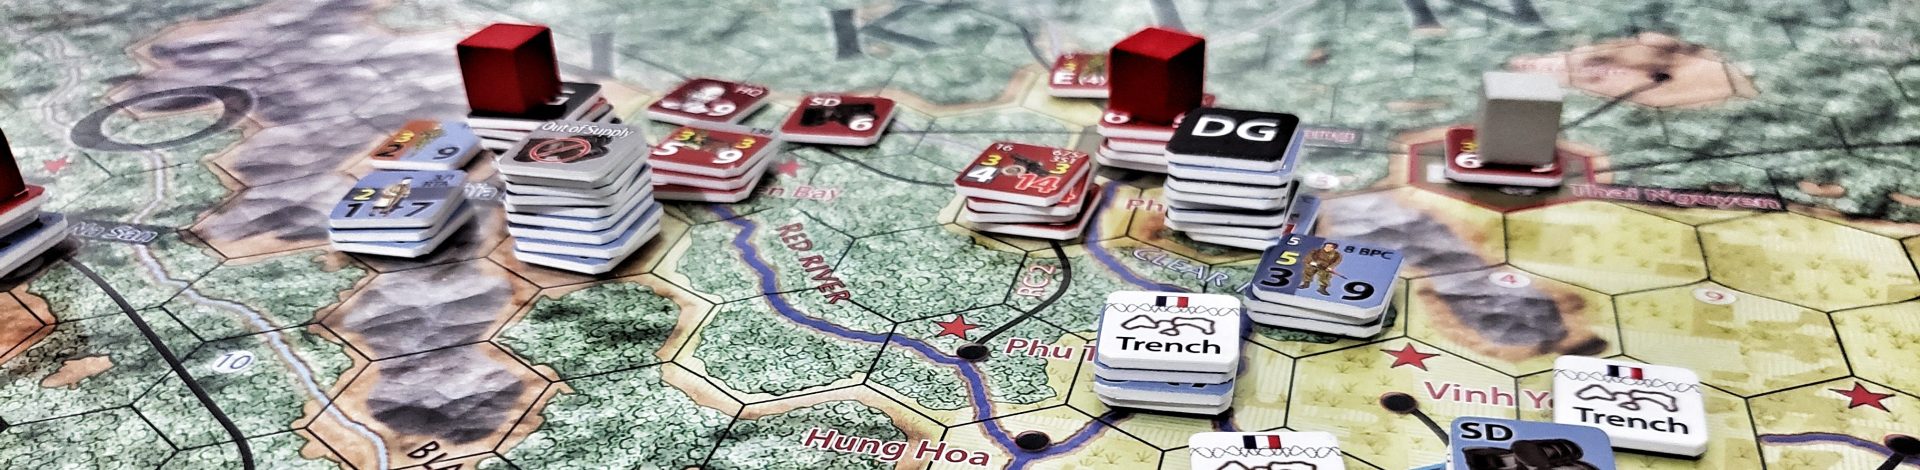
In order to receive supplies HQs and non-HQ units have to be in General Supply (GenS) which means that a Supply Path can be traced to a Primary Supply Source (PSS). Non-HQ units trace this path through their Formation HQ, which in turn is supplied by its Corps HQ and from there the Supply Path is traced through an Army HQ and eventually to a PSS. An example of this hierarchy is shown in the picture below.

The length of the Supply Path, measured in Movement Points (MP) like regular movement, is limited. For the most part supplies are transported by trucks, thus you need to make sure the Supply Path allows for Mechanized Movement. The distance between PSS and Army HQ, or between HQs can’t exceed 18 MP. The maximum length of the final leg of the Supply Path, between Formation HQ and unit, depends on the type of unit itself and ranges from 12 to 18 MP. Pay attention that the Mechanized Movement cost is cheaper in case of Supply movement.
The length of the Supply Path is shortened in harsher weather conditions. You can choose to extend the Supply Path by up to 1/3. Such an extensions will result in fewer goods shipped and/or un-favorable shifts during Ground Assault. Finally, with the help of Depots the Supply Path can be extended without negative side-effects (Think Extenders in OCS.).
Obviously not any sort of path is a viable Supply Path: It has to be free of enemy units. And while the Supply Path can run through a hex adjacent to an enemy unit, this can happen only twice. Also the Supply Paths between a Corps HQ and its Formation HQs must not cross with those of another Corps HQ.

It’s important to note that HQs determine their Supply Status during the Command Phase of a turn, while units determine their Supply Status during their friendly Administrative Phase of a turn. As a reminder here is the GOSS Sequence of Play (SoP):
- Air Allocation Phase (AM)
- Weather Determination Phase
- Command Phase (AM)
- Transport & Logistics Phase (AM)
- Allied Player Turn
- Allied Mode Determination Phase
- Allied Construction Phase
- Allied Movement Phase
- Axis Exploitation Phase
- Allied Combat Phase
- Allied Administration Phase
- Axis Player Turn (see above, reverse roles)
- Game Turn Complete
As you can see HQs check their status once per Game Day, regular units check their status every Game Turn.
The Supply Status is not a binary status. Rather each HQ/unit can be in one of five states:
- in GenS
- in GenS but not supported: higher level HQ doesn’t provide fuel or ammunition
- On hand Supply (OhS): no valid supply path, but enough supply in stock
- Out of Supply (OoS): no valid supply path and not enough supply in stock
- Out of Supply and Isolated: no supply path of any length, and not enough supply in stock
That should give you an idea of the tactical and strategical considerations you have to juggle with.
2) Logistics
When you have a valid Supply Path you can now move Supply. The resource that is used to handle Logistics is Truck Points (TP). Each Game Day the players receive a fixed amount of TP. They can then use those TP to either transport ammunition, transport fuel or motorize leg units. There are some limitations how you can split those points. For example, you can’t just decide not to provide any ammunition for an Allied Corps. Because…
No soup for you!
…is not an option. Let’s look at those three options.
Motorize Leg Units
This is one is pretty straight forward. For each TP spent the player can motorize three leg units (or any other static AT/Flak unit for that matter) regardless of their size. They will have then a Movement Allowance of 12. You can also use TP to ship ammunition from one Army HQ to another one.
Transport Fuel
The procedure for receiving fuel requires an additional step: After deciding on the number TP to be spent on fuel you roll a d10 and cross-reference the DR with the TP in the Logistics Table (see below). The table gives you the number of Fuel Points (FP) your Army HQ will receive. The FP are then distributed among the subordinated HQs. Obviously, the type of the HQ determines the amount of FP needed: An Army HQ requires one FP to be fully fuelled, whereas a Mech Division requires two FP. If only half of those FP are spent (or available) their states changes to Low Fuel. Anything below that means that particular HQ is out of fuel. I leave it to you to read about the consequences of having not enough fuel.
The Fuel Status is checked during the Mode Determination phase (see SoP above).

The DR adds an interesting aspect to the Supply simulation. Those of you who have played Multi-Man Publishing’s Battalion Combat Series (BCS) are familiar with this. In BCS you are encouraged to set up the ideal conditions for your Supply Chain. This gives you the highest probability to receive the full Supply. There’s however always a non-zero chance to receive less or even nothing. The effect is a ‘washed-out’ accountability (You never can be 100% sure what resources are available to work with.) and feels a little more realistic. Something similar happens in GOSS, the DR makes for a less-than-perfect accountability of resources. The difference between GOSS and BCS is that in BCS you always have the chance of a complete supply failure wherein GOSS, as soon as you decide to spend at least 1 TP, you know for sure that you will receive 1 FP (DR = 0).
Transport Ammunition
Transporting (artillery) ammunition ups the ante one more. There are two variables that play a role here: Ammunition Points (AmP) tell you how much ammunition is in your stockpile. Whereas an HQs Ammunition Depletion Value (ADV) describes the probability for a artillery unit running out of ammunition.
To determine how much ammunition is being delivered you roll a die like you did for fuel. Cross-referencing the Logistics Table (see above) gives you the number of AmP delivered. Let’s go through the procedure step by step (Pay attention to the order here.):
- Your Army HQ starts with a scenario-dependent ADV.
- An Army HQ is now allowed to spend ADV to create AmP (1 ADV = 2 AmP).
- The ADV of our Army HQ is adjusted according to the number of supported Corps HQs (more than 3 -> reduce ADV by one for each above 3, less than 3 -> increase ADV by one)
- Add to (or subtract from) HQ AmP the number found in the Logistics Table
- supported Corps HQ ‘inherit’ Army HQ’s ADV
- adjust Corps HQ ADV according to number of formations supported
- Adjust ADV of either Army or Corps HQ by spending AmP (2 AmP = 1 ADV)
When I first went through this I missed that in the second step the AVD can only be adjusted downwards. And I’m still puzzled about this step. I guess generating AmP at an Army HQ is something you want to do when you want to move AmP to another Army HQ. If not, it’s more advantageous to not decrease the Army HQ’s ADV since that’s the value the Corps HQs inherit. While you could use the generated AmP to increase a Corps HQ’s ADV in step four, it’s a rather inefficient way since now it’s only one Corps HQ that is affected instead of all of them. Let me know if I’m missing something here.
I went through a few mockup examples for fuel and ammunition delivery. And what in the beginning looked like a long and tedious process, turned out to be a rather quick step during each Game Day. That doesn’t mean you can’t spend hours agonizing over ‘who gets what?’.
That’s it?
Generally speaking, yes! Of course there are technicalities I didn’t mention. But they won’t change the gist of the Supply rules.
Wasn’t that bad after all!? Let’s see how everything feels during gameplay. The tutorial scenario Bloody Bucket ignores Supply rules. Which is absolutely ok. There’s enough other stuff to remember… Nevertheless, I’m looking forward to my first game with Supply rules.
Final Thoughts
I hope I could demonstrate that the GOSS Supply rules are not overly difficult. Are they fiddly? I guess in the beginning it will take some double-checking to make sure not to miss anything. The part that’s probably most time consuming is distributing the TP. And I guess it’s here where players’ opinions will diverge. If you don’t want to bother with this level of Supply micromanagement, the Command Phase will become a painful chore. On the other hand, if you accept the Supply simulation as part of the game then you probably won’t even think of it as time consuming.
But this also means that since Supply is a crucial part of GOSS, it is a make-or-break kind of aspect for GOSS. For many interested players it’s a show-stopper.
Well, I for my part, I’m more than ever motivated to play Hurtgen: Hell’s Forest. And if you are interested, please come back and read more about it.
Abraços,
Carsten
P.S. Playing a game in the Grand Operational Simulation Series requires quite some bookkeeping: Support Status, Fuel Status, AmP, ADV, Assets,… Not all the information can be tracked on the Army Record Tracks. The Vassal Module of Hurtgen: Hell’s Forest comes with a handy Supply Chart. Inspired by that I created a spreadsheet to help with all the note taking:

It’s not perfect yet, but it does its job. I uploaded a version of it to the GOSS Resources page. Feel free to use it.
P.P.S. I’d rather have a paper version of it while playing, but that will require some formatting. Apart from Corps bookkeeping counters, a Master Supply Sheet would be a useful addition in future releases of the game.
Changelog
- 2020-03-02 Added a link to the GOSS Resources Page with the new Logistics Spreadsheet.

Supply rules are often derided by wargamers. However, Tom Russell’s Supply Lines of the American Revolution series from Hollandspiele puts supply front & center in one of the best American Revolution wargames to hit the table. Few wargames have taught me so much about ‘why’ the geography was important like Supply Lines did. Best of all it does so without devolving into No Fun Accountants at War.
LikeLiked by 1 person
I heard so many good things about Supply Lines of the American Revolution. It’s just so hard to get a hand on it here. But reading your comment I will now put in some extra effort to add at least of the games to my collection. I will start with the print&play version. If you know both games in the series, which would you recommend?
LikeLiked by 2 people
Start with the first one, Northern Theater. Second in series is good but adds some extras that are nice but bit distracting.
LikeLiked by 2 people
Will do so! Thanks again!
LikeLiked by 2 people